Give tread, age, and damage separate checks
A tire can have visible tread and still deserve professional attention. You get a better picture by checking remaining tread, reading the manufacturing date, and looking for damage as three separate tasks.
Park somewhere safe with enough light to see the tires, secure the car, and let the tires cool before checking pressure. You do not need to crawl under the car or lift it to start a useful inspection.
Bridgestone's inspection guidance recommends checking tread, inflation, age, and visible condition. Use that combination to decide what needs attention rather than allowing one reassuring number to cancel everything else you see.
If a tire is visibly flat, has a bulge, or looks seriously damaged, stop treating the exercise as a routine checklist. Arrange qualified assistance and describe the condition before deciding how the vehicle should move.
Look across the tread instead of finding its best spot
The tread is the patterned rubber that meets the road, and it can wear differently across its width. A reading taken only from the deepest-looking groove may hide a much more worn section nearby.
Use a tread-depth gauge according to its instructions and record several readings across the main tread grooves where the tool is intended to measure. Avoid placing its probe on a raised wear bar and mistaking that for the groove floor.
Move around the accessible circumference as well as across the tread. You are looking for variation, so note which tire and which location produced each concerning reading rather than keeping only a single average for the whole car.
If you cannot reach a section safely, mark that part as unchecked. A partial inspection honestly described is more useful than a complete-looking record built from guesses about the inner shoulder.
Do not use your hand to sweep blindly across tread that may contain sharp objects. Good light and a careful visual check can help you notice a puncture object without exposing your fingers to it.
Use wear bars and the penny as warning aids
Bridgestone explains that built-in treadwear bars become level with the surrounding tread at 2/32 inch. If you find the tread level with those bars, arrange replacement rather than treating the bars as decorative ridges.
The familiar penny test can also flag tread at about that threshold: place Lincoln's head downward in the groove and look for the top of his head. It is a rough screening tool, not a detailed measurement of the entire tire.
A penny result from one spot cannot tell you how much tread remains everywhere else. If you already have a gauge, use it to document the shallow locations and show the readings to the tire professional.
Do not translate a barely passing screening result into a guarantee for your next rainstorm or road trip. Tread depth is only one input, and your driving conditions may justify replacement before you reach a minimum threshold.
If you are preparing for a long trip, bring up the trip when you request inspection. The practical question is whether the present condition suits that planned use, not merely whether one coin can still disappear in one groove.
Find the date at the end of the DOT marking
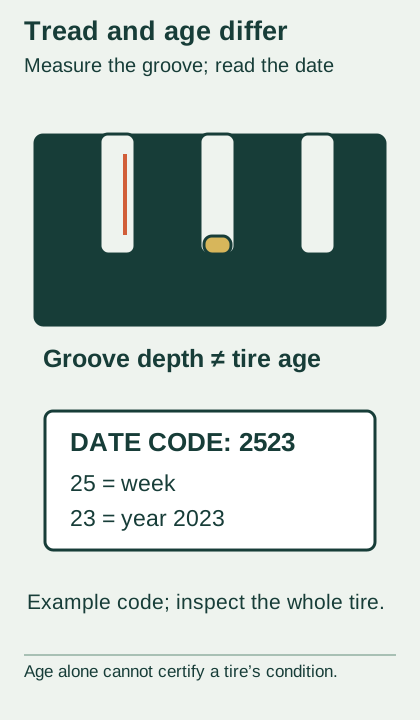
Look for the DOT marking on the sidewall and its four-digit manufacturing date code. Bridgestone explains that the first two digits identify the week and the last two identify the year.
For example, 2523 means the 25th week of 2023. It does not mean the tire was installed in 2023, and it does not tell you how the tire was stored or used before you acquired it.
Photograph the code and attach the image to a note for that wheel position. A clean photograph prevents you from later wondering whether you copied a 3 as an 8 while crouching beside the car.
If you cannot find the complete date code on the outward-facing side, ask a shop to locate it. Do not crawl into an unsafe position or improvise a vehicle lift simply to finish a date-code worksheet.
Check each tire separately, including the spare when accessible under its instructions. A car can have replacements from different periods, so the date on the first sidewall you read is not a reliable birthday for the entire set.
Age is context, not a remaining-life calculator
Bridgestone recommends removal from service no later than ten years after manufacture, while noting that tread life alone does not settle replacement. Your vehicle or tire manufacturer may specify an earlier limit, so check the requirements for what you actually own.
Do not read a maximum age recommendation as a promise that a younger tire is sound. Damage, use, pressure history, and other conditions can require replacement much sooner.
Equally, you cannot calculate dependable remaining mileage by subtracting the date from a guideline. A parked vehicle with low annual mileage can still need tire attention, even if its odometer barely moved between inspections.
If you are buying a used car, ask for tire replacement records as well as reading the codes. The date tells you when the tire was manufactured; an invoice may help explain when it entered service and whether the whole set was replaced together.
Write unknown history as unknown instead of filling the gap with the seller's general description that the tires look nearly new. Appearance and documentation answer different questions, and you want both when possible.
Make visible damage easy to describe
Inspect the accessible tread and sidewalls for cuts, cracks, punctures, bulges, and unusual wear. Bridgestone recommends professional evaluation of suspicious conditions rather than expecting you to determine the severity from appearance alone.
Take a wider photograph showing the tire's location and a closer photograph showing the concern. Include enough surrounding detail that a shop can understand whether you are pointing to the tread, shoulder, sidewall, or wheel.
Do not pull out a screw, plug a sidewall, or add sealant simply to see whether the tire holds air afterward. Ask a qualified repair professional to evaluate the location, internal condition, and repair options before choosing a remedy.
If you recently hit a pothole or curb, mention that event even when the visible mark looks small. Your inspection cannot reveal everything inside the assembly, so the history helps the professional decide what further examination is needed.
A pressure reading belongs in this record too, but it does not settle the damage question. A tire that holds pressure during a quick check can still have a condition that deserves inspection before normal use continues.
Finish with a decision and a record
Give the shop the shallowest readings you found, each date code, the damage photographs, and any recurring pressure loss. Ask which tires need immediate attention and whether the remaining set should be evaluated together.
Keep the response specific to your vehicle and planned driving. If replacement is recommended, ask for the actual reason so you can distinguish worn tread, age guidance, visible damage, and an internal condition discovered during inspection.
Save the new tire details after the work is completed and schedule the next routine check. You are building an easier baseline for future observations, which is more useful than trying to remember whether the same crack appeared last summer.
Your home inspection succeeds when it produces clear observations and timely follow-up. It does not need to produce a verdict about every tire's internal structure or an exact number of safe miles remaining.
If you share the vehicle with someone else, put the inspection note where both of you can find it. That prevents a recurring low tire or an outstanding shop recommendation from disappearing between drivers.
Bring the wheel-position notes with you rather than relying on a gallery of unlabeled close-up photographs. The shop needs to connect each observation to the correct tire before it can explain the recommended next step.

Sources & scope
Checked October 15, 2026. Manufacturer examples apply to the named model and document. Reader scenarios and organization are original editorial explanations.
- Bridgestone: Evaluate Your Tires — Date code week/year; maximum age recommendation; damage checks and professional evaluation.
- Bridgestone: Replacement Guidance — 2/32 wear bars and penny screening; inspect wear and visible condition.
- Michelin: Routine Tire Care — Balance assembly mass with equipment/weights; tread gauge across/around main grooves.